Customizing your table layout ensures a seamless dining experience for your staff and customers. This guide explains how to add, edit, and adjust tables on your CAKE POS floor chart, including creating zones and customizing table settings.
Table of Contents
- Enabling Table Settings
- Accessing the Table Layout Editor
- Adding New Tables
- Editing Existing Tables
- Finalizing Your Changes
Before adding or adjusting your table layout, ensure the appropriate settings are enabled:
- Navigate to Main Menu > Settings > System Options.
- Under Table Service Settings, toggle on Table Settings.
- Add at least one zone in the Zones Tab (e.g., "Dining Area" or "Patio").
To begin editing your table layout:
- Navigate to Main Menu > Tables.
- Click the Edit button at the top-right corner of the screen.
Note: You must have the Edit Table Layout permission to update the table layout.
To add new tables to your floor chart:
- Click Add Table.
- Enter the following details:
- Table Number: Assign a number for identification.
- Number of Seats: Specify the number of guests the table can accommodate.
- Shape and Size: Select the shape and resize as needed.
- Manage table status:
- Active Tables: Ensure these are marked active for use by employees and servers.
- Inactive Tables: Use these for non-seating landmarks like podiums or bars. Inactive tables will appear striped on the layout and cannot be used for seating.
- Click Add Table to place it on the layout.
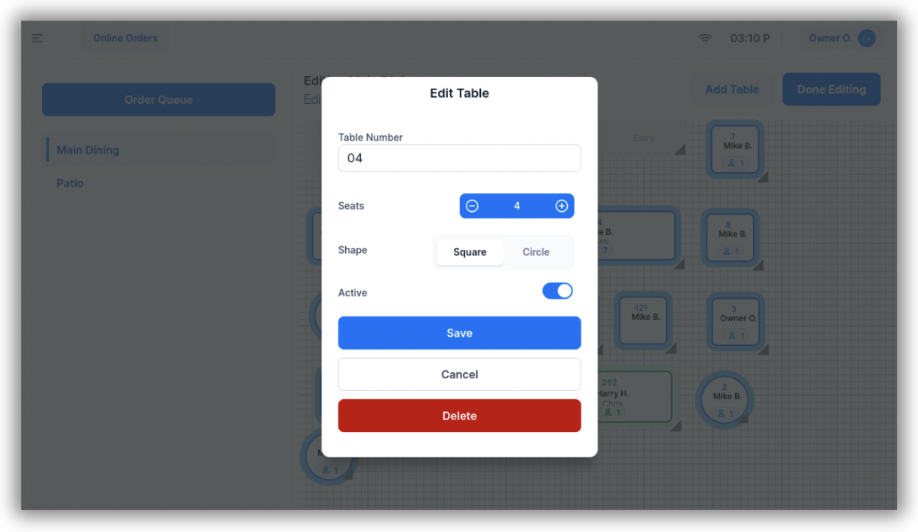
To adjust or relocate existing tables on the layout:
-
Move a Table:
- Click and drag the table to reposition it on the layout.
-
Resize a Table:
- Use the gray arrow in the bottom-right corner of the table to adjust its size.
-
Customize Table Details:
- Click on the table to update the following:
- Table Number: Modify the table’s assigned number.
- Number of Seats: Adjust the number of guests it can accommodate.
- Shape: Change the table's shape (e.g., round or square).
- Active/Inactive Status:
- Active Tables: These are available for employees to use.
- Inactive Tables: Use for landmarks such as bars or podiums. Inactive tables appear striped on the layout.
Once your adjustments are complete:
- Click Save to ensure your changes are recorded.
- Delete tables if needed by selecting them and clicking Delete.
- Click Done Editing to exit editing mode and return to the tables screen.
By customizing your table layout, you can optimize your floor chart for efficient service and a better customer experience.
For further customization options, we recommend reviewing the next article: Profile.