This guide will help you set up and configure CAKE KDS, from unboxing to connecting the KDS with your POS system. We’ll cover each setup step, including touchscreen and network configurations, so your kitchen can operate efficiently and communicate seamlessly.
Table of Contents
The following should be included in your package:
Quick Installation Guide:
-
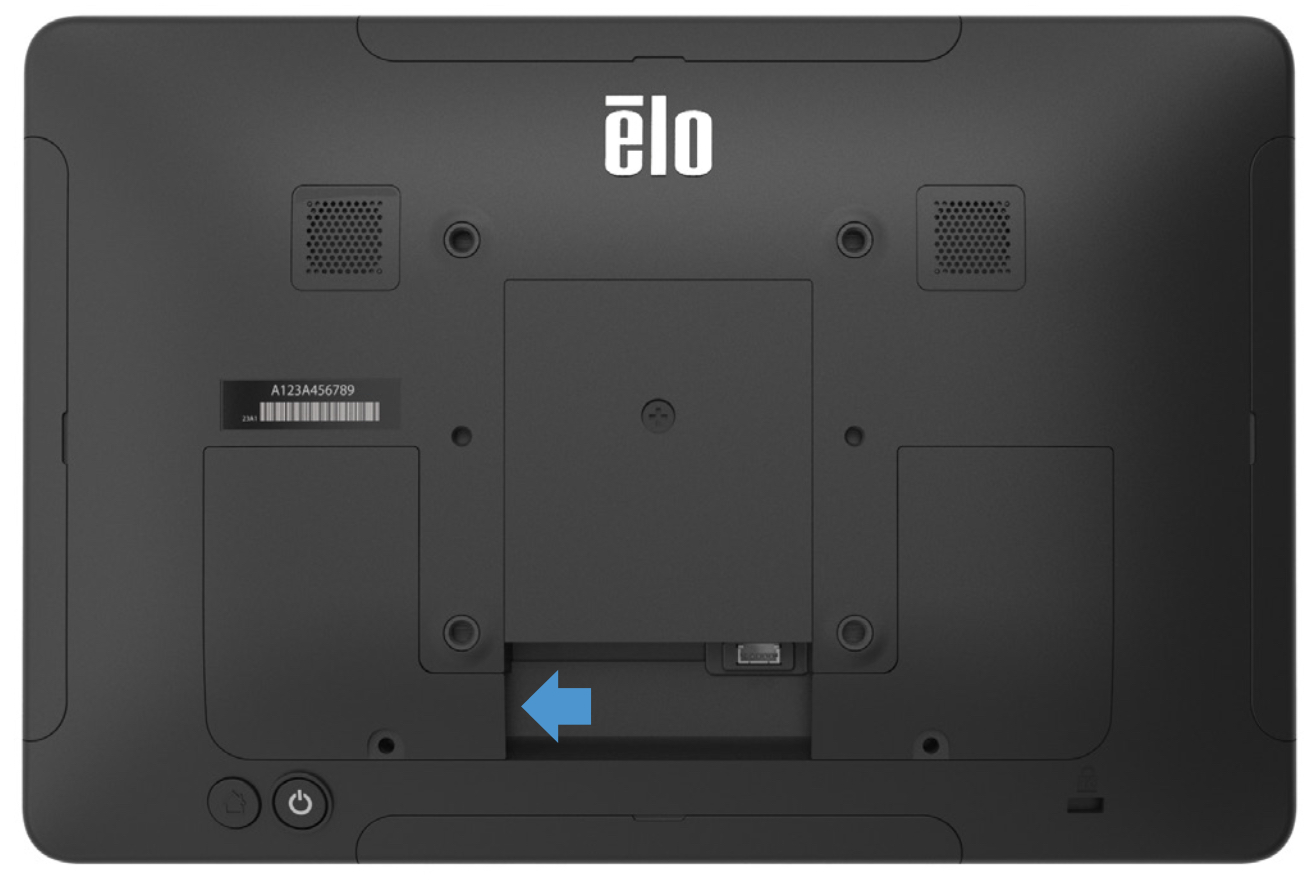
Remove the Left-Side Cable Cover
- Gently lift the left-side cable cover upward to access the hardware connections.
-
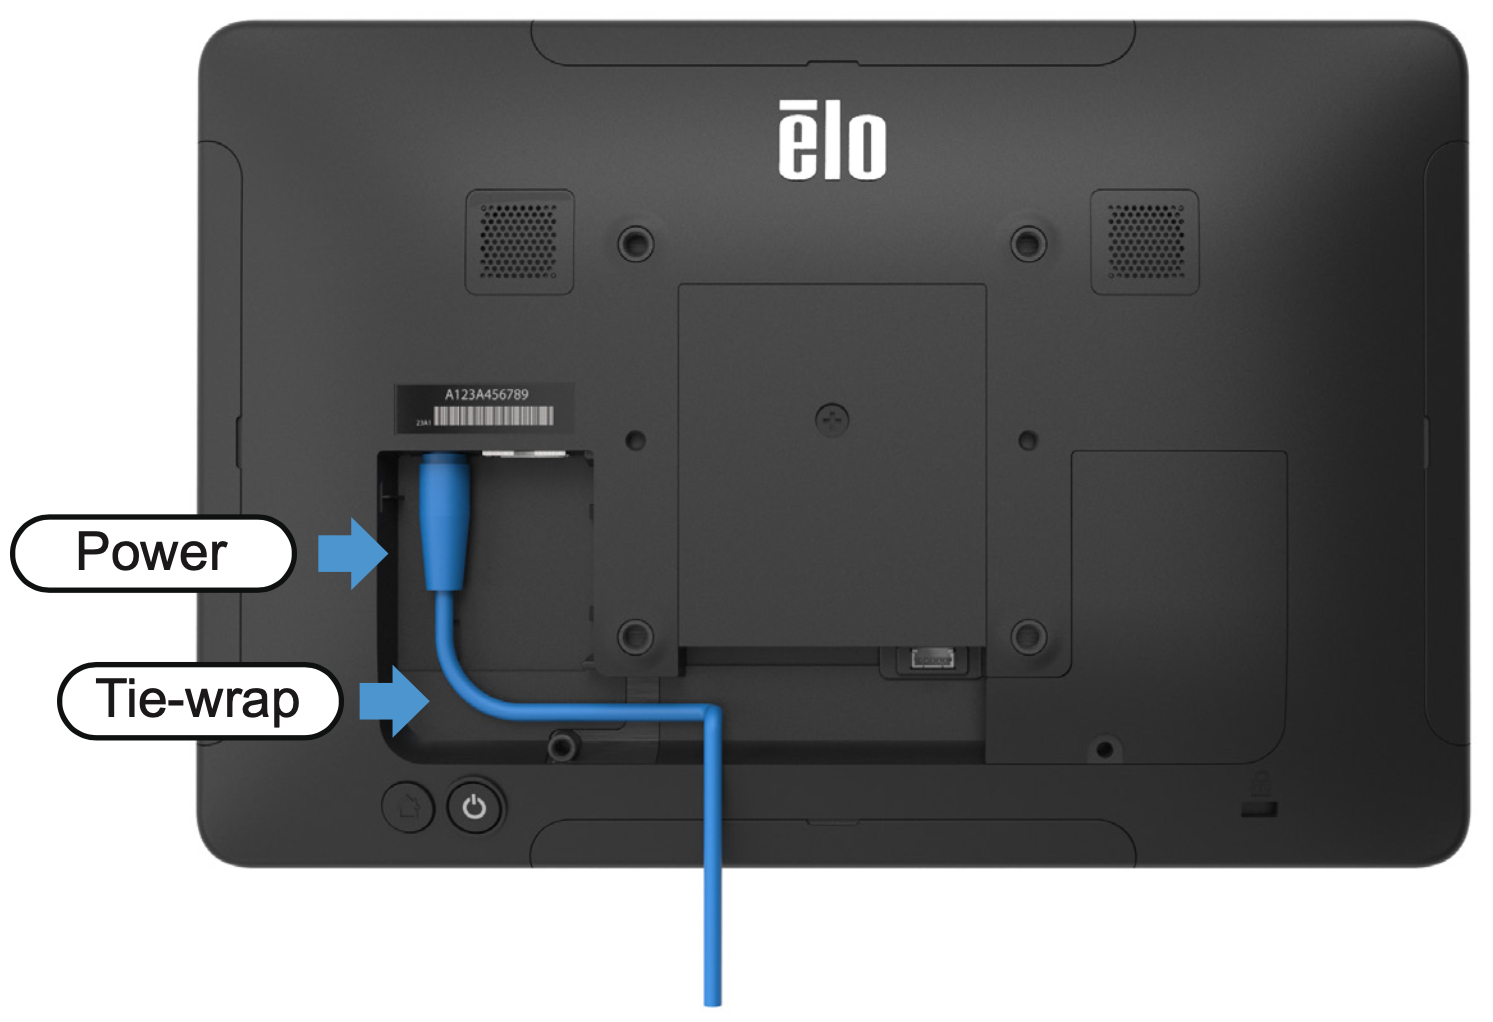
Connect the Power Cable
- Attach the power brick to the power cable.
- Plug the power cable into the Elo Touch Screen. The Elo Touch Screen will automatically turn on when connected to power.
-
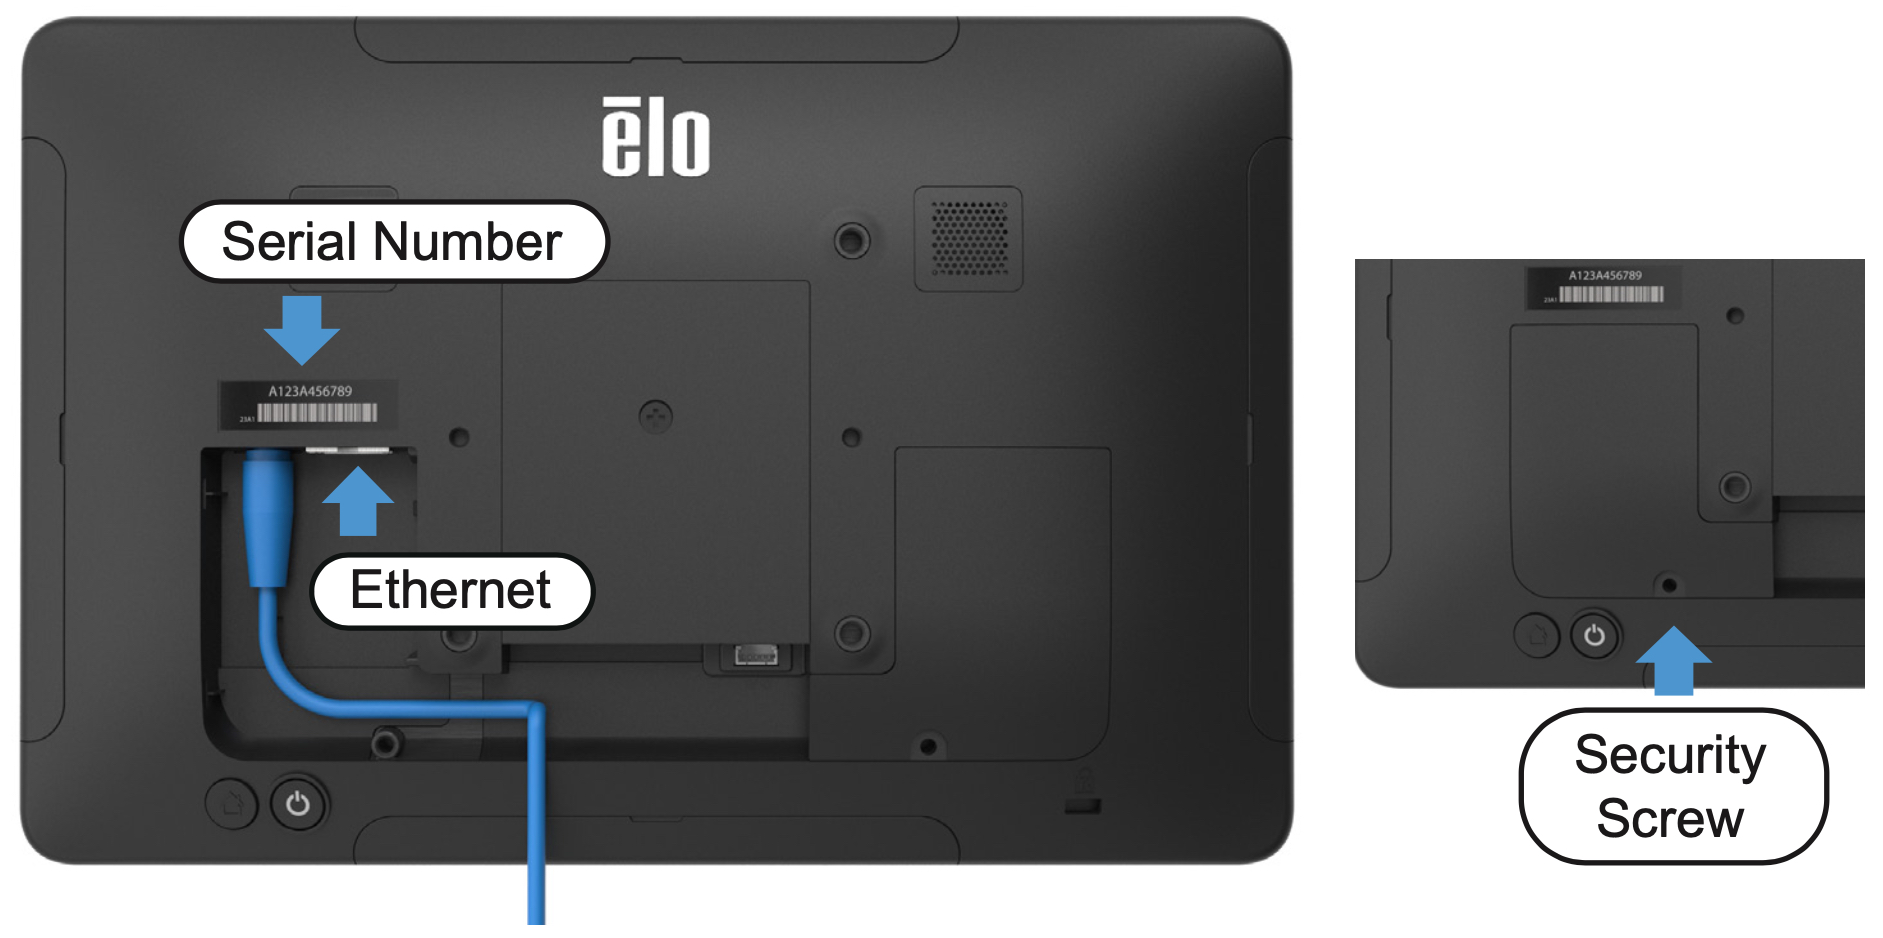
Set Up Network Connection
- Connect an Ethernet cable or opt to set up Wi-Fi later during the software configuration. Once connected, reattach the cable cover and secure it with the provided screw to protect connections.
After unboxing and connecting the cables, the Elo Touch Screen will guide you through the initial system setup. Follow these steps:
-
Language Selection
- Select your preferred language for the interface.
-
Wi-Fi Setup
- Connect the device to a Wi-Fi network if Ethernet isn’t connected. Choose a secure network, as this will be essential for device connectivity and updates.
-
Updates
- The system will automatically check for the latest Elo Touch Screen updates. If an update is available, it will prompt you to download it or begin auto-downloading to ensure you have the latest software.
-
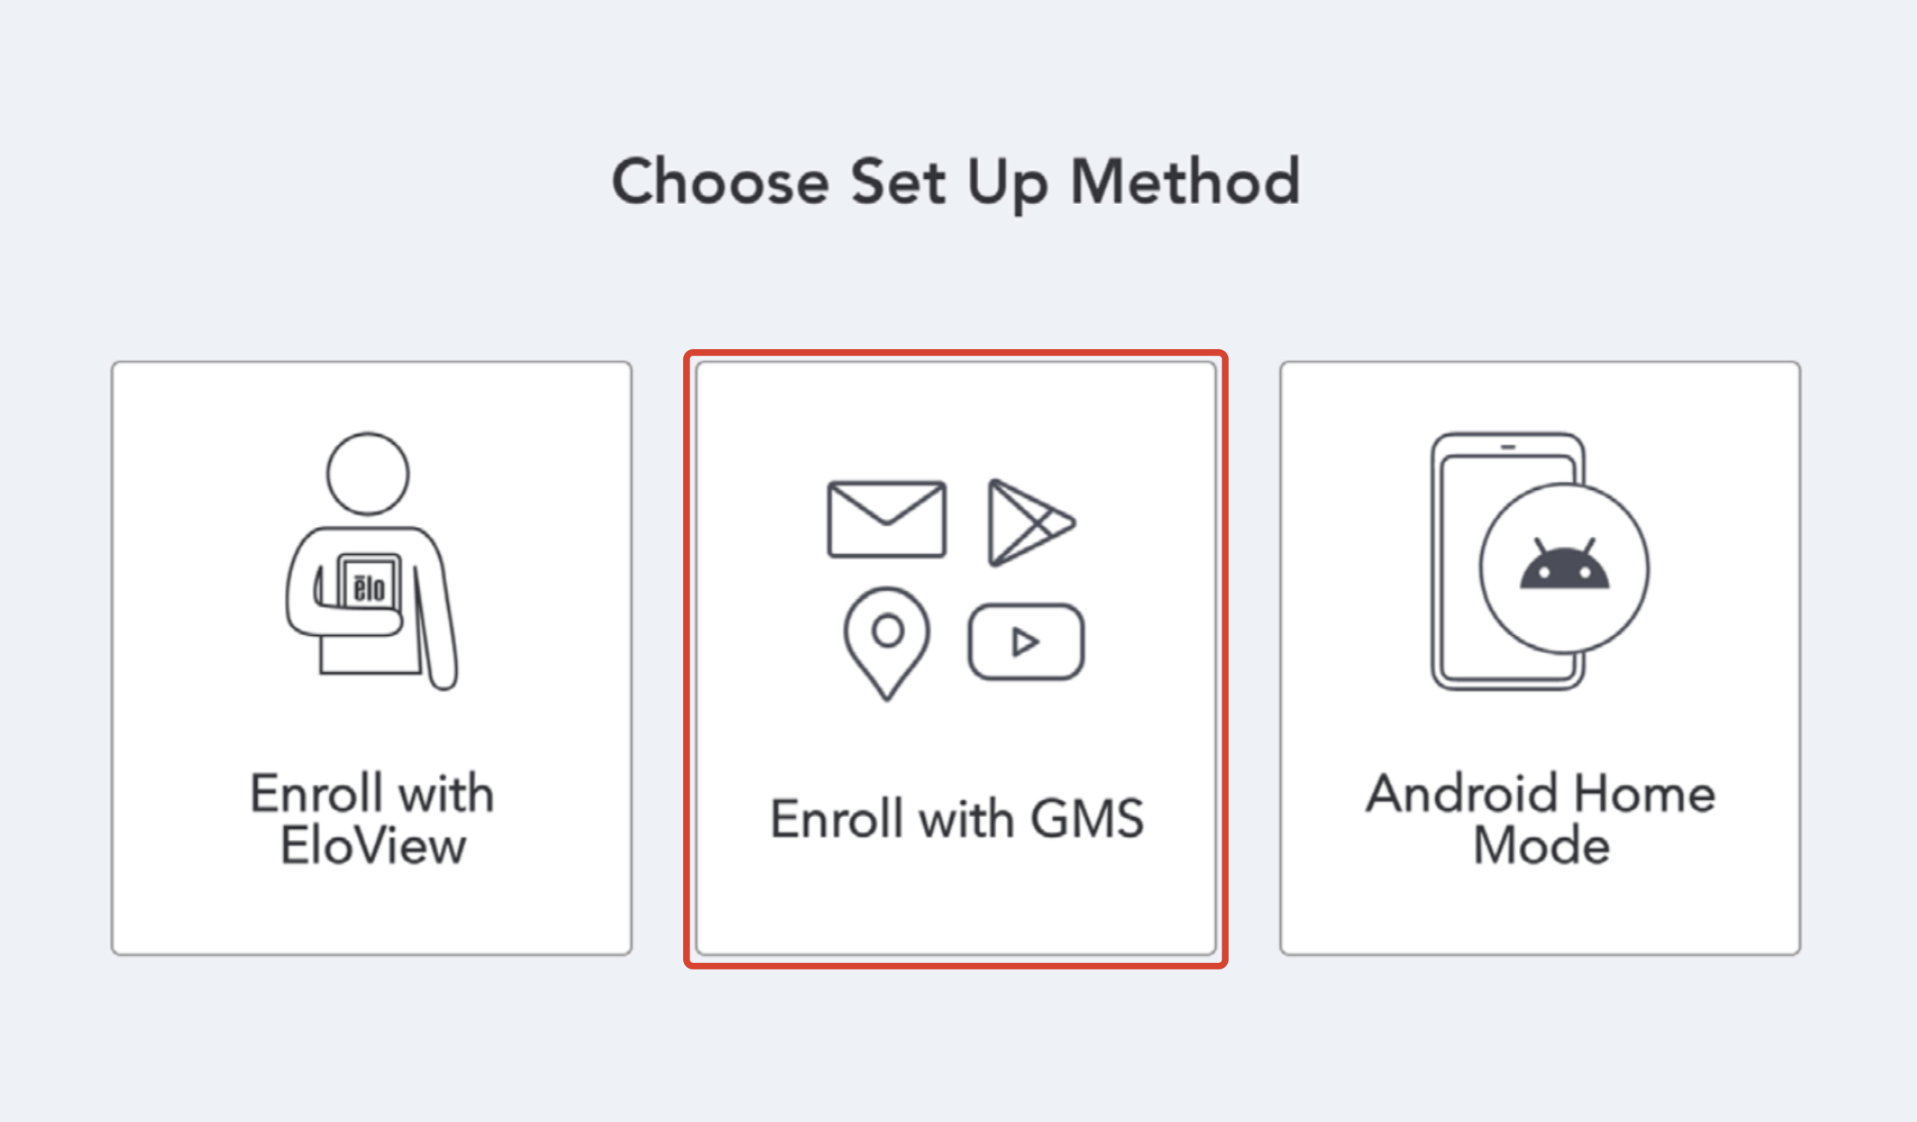
Choose Set Up Method: Gmail Account Setup
- The Elo Touch Screen will prompt you to choose your set up method: Enroll with EloView, Enroll with GMS, or Android Home Mode.
- Select 'Enroll with GMS'.
- Sign into your Gmail account. This step is required for enrollment with Google Mobile Services (GMS) and enables app downloads and other functionalities on the device.
-
Gmail Settings
- The device will display several Gmail-related toggle settings, such as options for syncing with Gmail, sharing location, and other preferences. Adjust these settings as desired to optimize Gmail integration on the device.
-
Face Recognition (Optional)
- Set up face or voice recognition as a security measure for unlocking the device.
-
PIN Option (Optional)
- Choose to set up a PIN as an additional or alternative security method for unlocking the Elo Touch Screen.
With the initial system setup complete, your device is now ready for configuration in Menu Admin and final KDS setup steps.
This section covers the critical configuration steps for your CAKE KDS, including configuring Menu Admin and selecting your preferred KDS setup.
-
Login to the Admin Portal
-
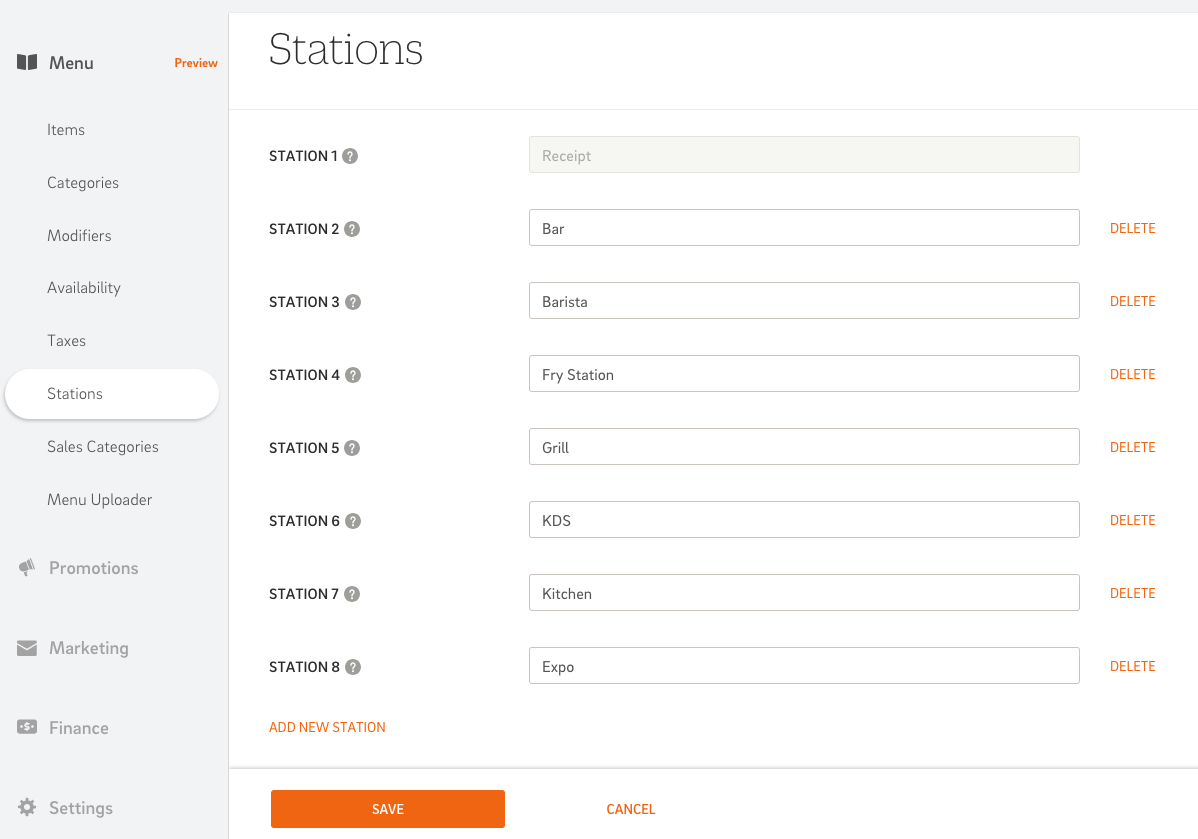
Create a New KDS Station
- Go to the Stations tab, select Add New Station to create a KDS station.
- A new station number and field will appear. Enter the KDS Station name of your choice, then click Save.
-
Assign the KDS Station to Items or Categories
- KDS Stations need to be assigned to items for them to display on the KDS. There are 2 ways to assign the KDS station to items:
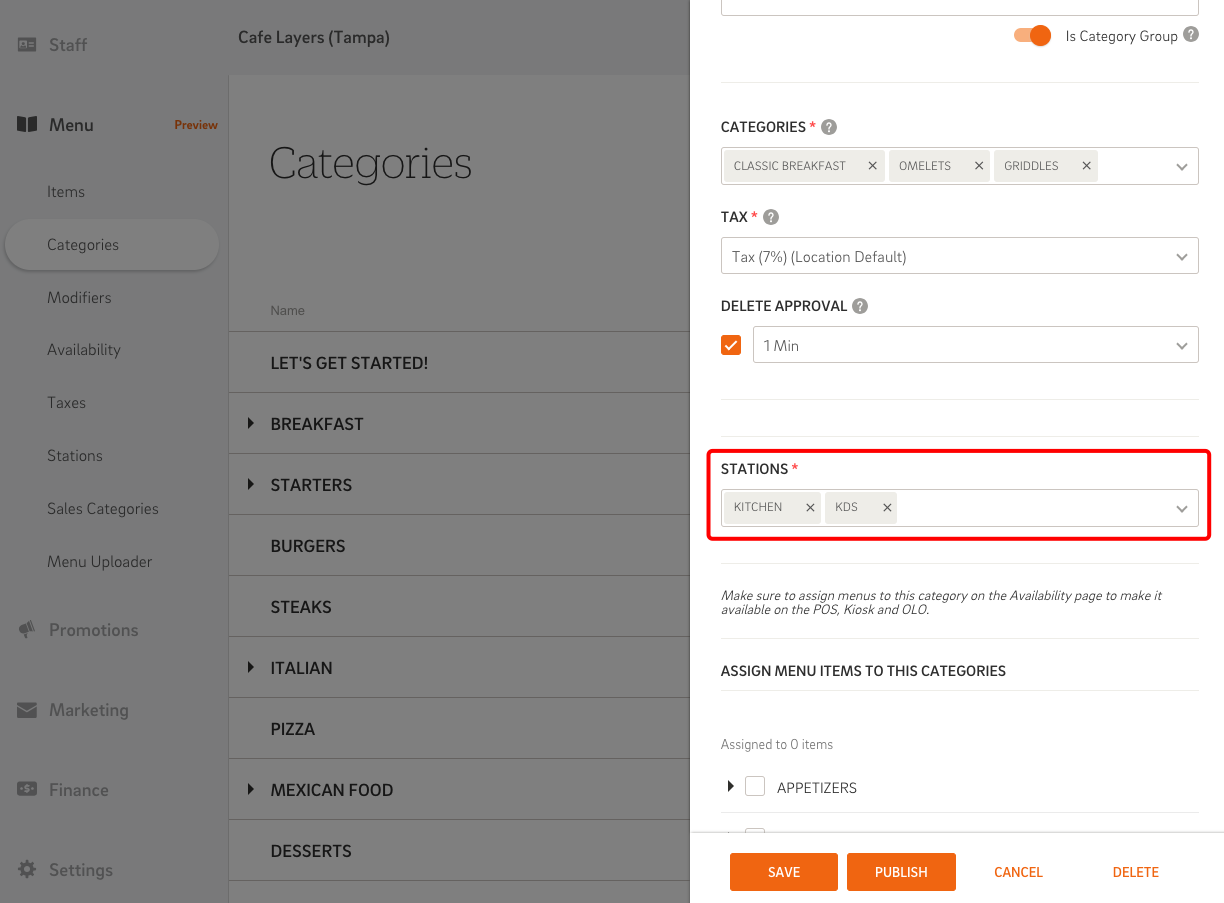
- Assign the KDS Station(s) via the Edit Category Menu: Enable a bulk change and assign all the items within the desired category to the KDS station.
- In Menu Admin, Select the Categories tab on the left-side menu.
- Select a Category to open the Edit Category menu.
- Locate the Stations field, then select the KDS station name from the drop-down.
- Select Save. All items within that category will now have the KDS station assigned to them.
- Note: Confirm all station assignments for items are selected from the drop-down. All previous station assignments for the items will be removed from the items if they are not listed in the stations field.
- Assign the KDS Station(s) via the Edit Item Menu: Assign the KDS station to specific items.
- In Menu Admin, select the Items tab from the left-side menu.
- Select an Item to open the Edit Item menu.
- Locate the Stations field, then select the KDS station name from the drop-down.
- Select Save.
To get the most out of CAKE KDS, it’s important to understand the roles of Prep and Expo stations and how they work together in different configurations.
- Prep Stations: These are the stations where food preparation takes place. Each Prep KDS station shows individual orders, item details, and any special instructions for the kitchen staff to execute.
- Expo Stations: An Expo station, often managed by an expeditor, is responsible for final order assembly and quality control. This station allows the kitchen team to see which items are completed and ready to be plated or served, coordinating timing and presentation.
Before proceeding, review the following KDS configurations to choose the one that best fits your kitchen’s workflow. Selecting the right configuration will guide the next onboarding steps and ensure smooth order handling.
KDS Configuration Options
- Single Prep Station: Ideal for smaller kitchens, this setup uses one KDS as a single designated prep station where all orders are displayed and managed.
- Multi Prep Station: In larger kitchens or those with specialized stations, each KDS is configured separately for individual prep stations (e.g., grill, salad, desserts).
- Note: For prep-only setups, make sure the Sync to Expo option is toggled OFF in the KDS settings to avoid errors.
- Expo and Prep Station: This configuration is suitable for kitchens with a designated expeditor who monitors completed items, assembles dishes, and coordinates the timing of each order.
- Set Up: In this setup, onboard the Expo KDS first as Stage 2 - Expo, then onboard each prep KDS for order preparation.
- Expo and Multi Prep Station: This set up combines multiple Prep KDS stations with a central Expo KDS station, offering the highest level of coordination for large or complex kitchens.
- Set Up: Onboard the Expo KDS first as Stage 2, followed by each individual prep KDS.
Each of these configurations can be tailored to support your kitchen’s specific workflow, helping to ensure smooth communication and efficient order handling from start to finish.
After completing the basic setup and menu admin configurations, it’s time to download the CAKE KDS app and activate it on the Elo Touch Screen.
-
Download the App
- Access the Android Play Store, search for CAKE - Kitchen Display, and download the app.

-
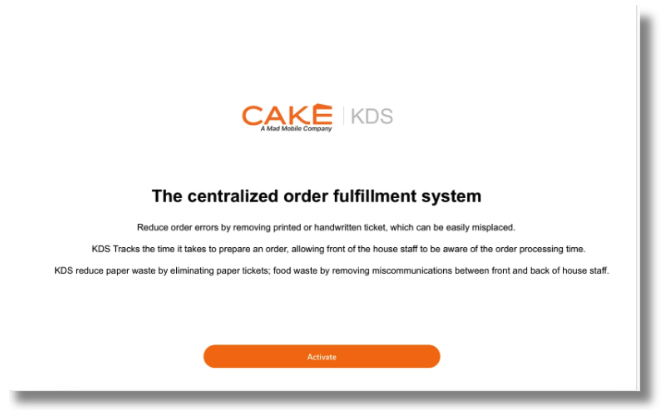
Activate the App
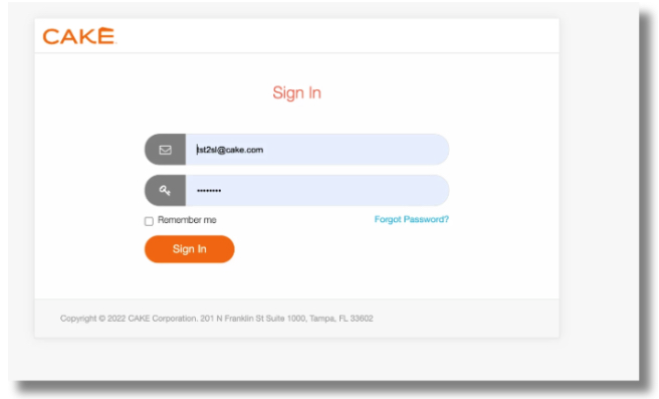
- Open the app, select Activate, and log in with Admin Portal credentials (Restaurant Admin permission required).
-
Select Location and Station
- Select Restaurant: If prompted, select the restaurant location where this KDS station will be used.
- Select a Station: Choose the specific KDS Station name. This step links the device to its assigned role in your kitchen workflow. Follow the instructions below based on your setup:
- Onboarding an Expo Station (if applicable):
- If your setup includes an Expo KDS, onboard it first before any Prep stations. Select the ‘Stage 2 - Expo’ option as the station name. This setup allows the Expo station to sync orders from all Prep stations and manage completed items effectively.
- Onboarding a Prep Station:
- For each Prep station, select the station name you configured in Menu Admin for that specific kitchen area (e.g., grill, salads, desserts). This ensures that each Prep station displays only the order details relevant to its role in the preparation process.
Configuring the KDS on the POS system ensures seamless communication and order tracking. Follow these steps to set up your KDS on the CAKE POS.
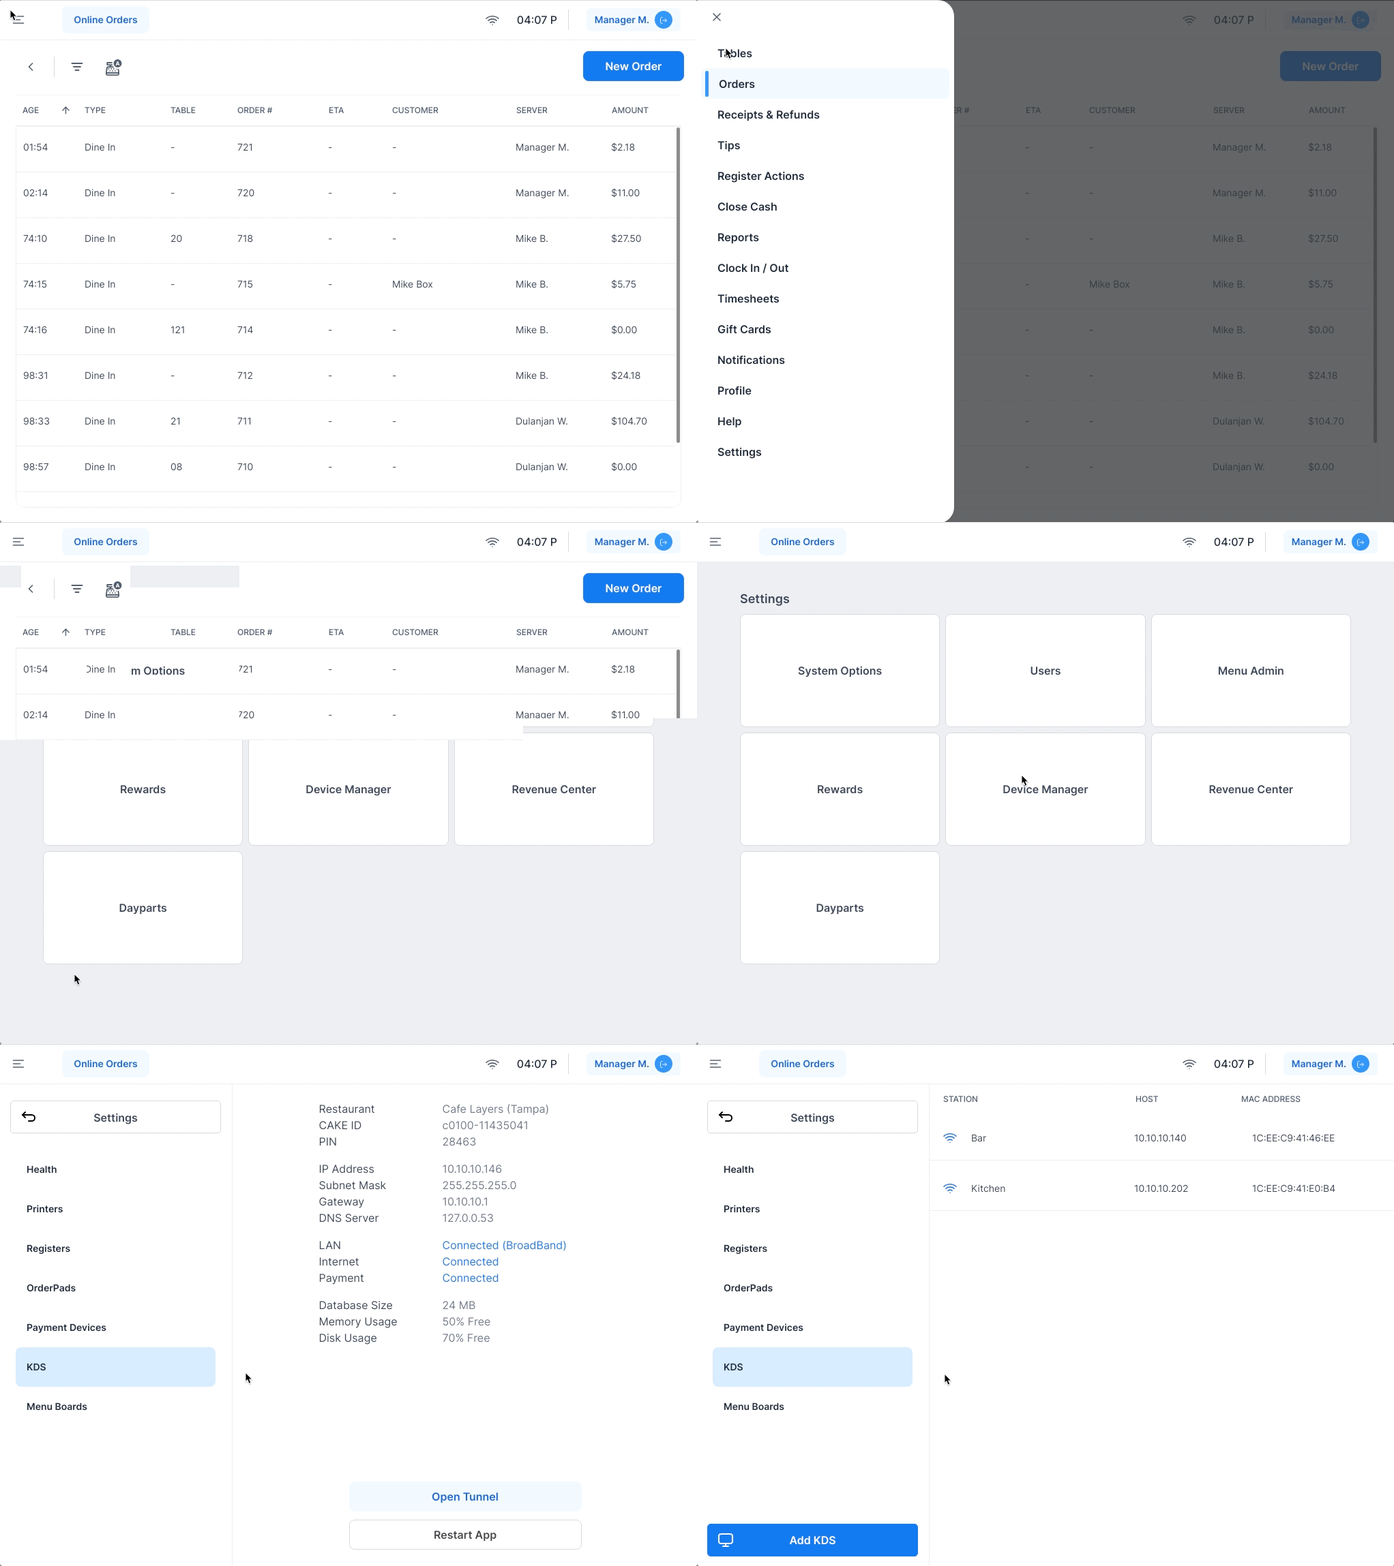
Adding a KDS Station in Device Manager
-
Open Device Manager
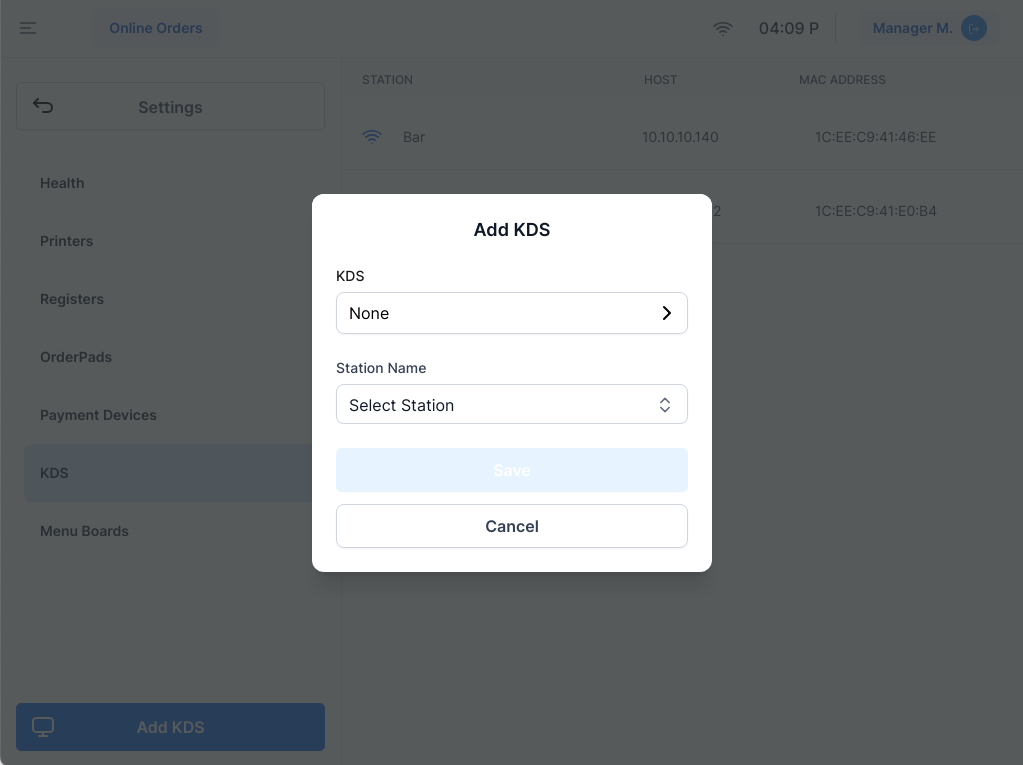
- Add a KDS
- Click Add KDS on the bottom left. All available KDS station names will be listed.
-
Select and Save the KDS Station
- Choose the KDS Station name from the list, then select Save.
Configuring Sending Settings in System Options
For orders to display correctly on CAKE KDS, it is recommended to configure the POS Sending Settings. Follow these steps:
-
Open System Options
- Go to Main Menu > Settings > System Options > Select the SENDING tab.
-
Adjust Sending Settings
This section provides solutions for common issues you may encounter during or after KDS setup. Quick fixes help keep your kitchen display system running smoothly.
- Common Issues
- KDS Station Not Displaying Orders: Verify that the station is assigned to relevant menu categories in Menu Admin.
- Connection Problems: Ensure that the KDS is properly connected to the CAKE network via Ethernet or Wi-Fi.
- Error Messages
- "Network Connection Error": Check your Ethernet connection or Wi-Fi setup.
- "Station Not Found": Confirm the KDS station is properly added in both Menu Admin and POS Device Manager.
- Re-onboarding a KDS
- If re-onboarding is necessary, follow these steps:
-
-
- Access KDS Settings: Tap the settings icon in the top-right corner of the KDS screen.
- Reset the KDS: Select Reset KDS to initiate re-onboarding.
Following these practices will help you get the most out of your CAKE KDS and minimize potential disruptions in daily operations.
- Regular Updates: Keep the KDS app updated to maintain compatibility with new features and security improvements.
- Assign Categories Promptly: Immediately assign KDS stations to menu categories to prevent order display issues.
- Optimize POS Sending Settings: Adjust POS sending settings to match your kitchen’s workflow, improving efficiency and accuracy.
This guide has covered all the essential steps for unboxing, setting up, and troubleshooting your CAKE KDS. By following these instructions, you’ll ensure a smooth KDS deployment, enhancing kitchen communication and order accuracy.
Mastering CAKE KDS: A Complete Guide to Navigating CAKE KDS
CAKE KDS Navigation Page


