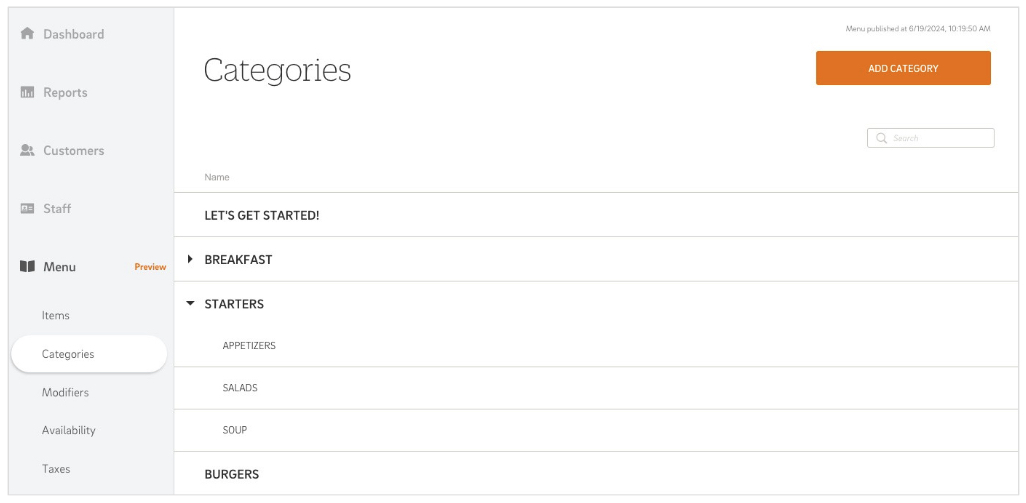
Efficiently managing your menu categories and subcategories is crucial for seamless operation. The Categories tab in the Enterprise Menu allows you to view, edit, and add categories and subcategories to your menu, ensuring everything is organized and easily accessible across various platforms like POS, Online Ordering, and Kiosk.
Table of Contents
- Navigating the Categories Section
- Adding & Editing Categories
- Adding & Editing Subcategories
- Multi-Location Features - Do you have multiple locations on EMS? Start here!
Category List Details
Within the Categories section, you can view the names of all categories and subcategories on the menu. A category can be selected to access the edit menu.
Revealing Subcategories
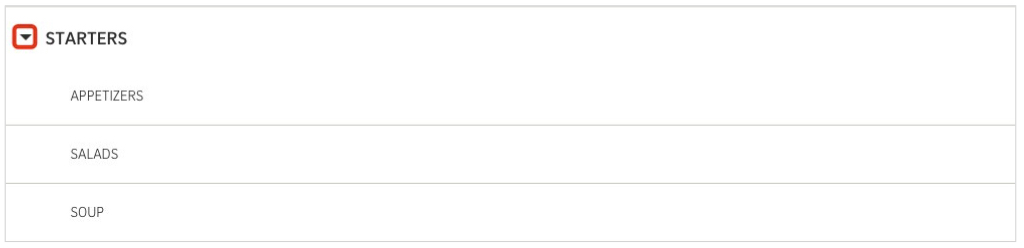
Parent categories have a black arrow to the left of them. Selecting the black arrow will reveal the subcategories beneath the parent category.
Sort Order
To change the sort order in which your categories display:
- Select the black arrow to the left of a category name to reveal the items within it.
- Hover over an item with your mouse, you will see 3 lines appear to the right of the item.
- Click and drag the lines to change the sort order of the item.
Step-by-Step Guide for Adding Categories:
- Navigate to Categories Section:
- Access Menu Admin and navigate to the Categories section.
- Create New Category:
- Click the orange Add Category button at the top right of the screen.
- Fill Out the Add Category Menu Fields:
- Complete the required fields in the Add Category edit menu.
- Save or Publish Changes:
- Select "Save" to save changes in Menu Admin.
- Select "Publish" to save changes and apply them to the live menu.
Note: If you are making multiple edits, press "Save" after each edit to queue the changes. Once all edits are complete, select "Publish" to apply all queued changes to the POS, Online Ordering, and/or Kiosk.
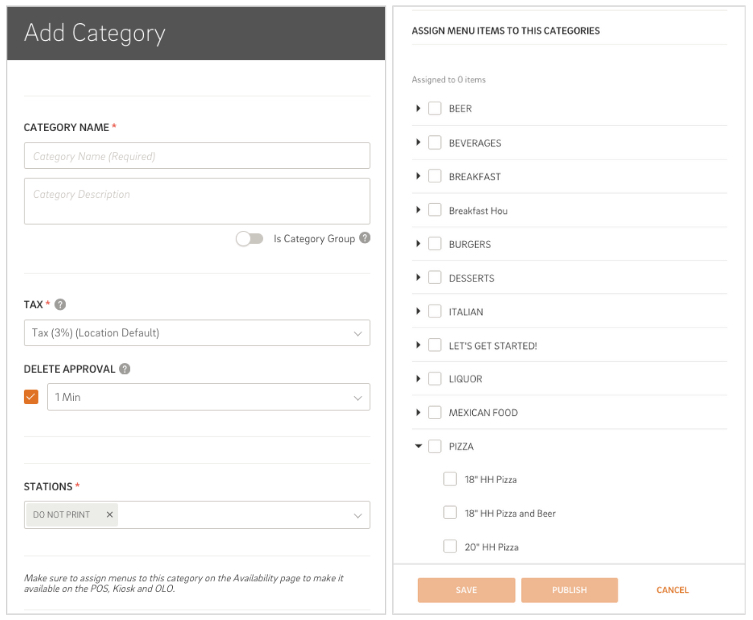
Add/Edit Category Menu:
Below is a breakdown of the various fields available when adding or editing a category.
- When editing, view details on each field by hovering over the
 icon to gain further insight.
| Field Name | Description |
| Category Name | Name of the Category. |
| Category Description | Description of the category – this will only be displayed on Online Ordering. |
| ‘Is Category Group’ Toggle | When ‘Is Category group’ is toggled ON it allows subcategories to be assigned to the category. |
| Tax - NEW! |
Assign a tax rate for items within the category.
This can be used for bulk changes. When a tax rate is applied to a category, it will assign the tax rate to all items within the category. NOTE: Previous tax assignments will be removed from items.
|
| Delete Approval | Set a grace period to allow employees to delete items off an open order for X minutes before manager approval is required. |
| Stations - NEW! |
Assign stations (printers and/or KDS stations) for items within the category to print/display on.
This can be used for bulk changes. When Station(s) are assigned to a category, it will assign the station(s) to all items within the category. NOTE: previous station assignments will be removed.
|
| Assign Menu Items to this Category | Select any pre-existing items on your menu to be reassigned to the category – You will see all your menu categories list, select the black arrow to the left of the categories to reveal the items beneath it. |
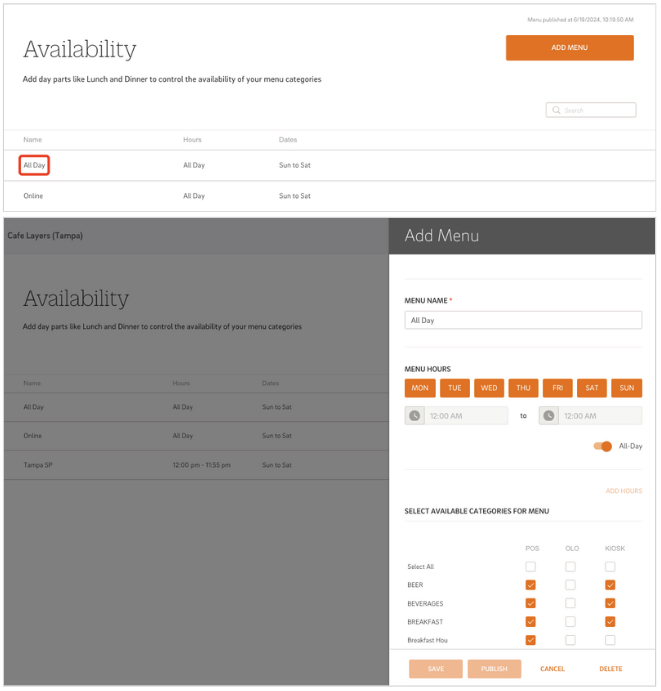
To manage category visibility, follow these steps:
- Navigate to the Availability Section:
- Go to the ‘Availability’ tab in Menu Admin.
- Set Visibility:
- Select the menu name for which you want to set category visibility.
- All your categories will be displayed with columns indicating visibility options for POS, Online Ordering (OLO), and/or Kiosk.
- Choose the desired visibility options for each category to display on the selected platforms.
For more detailed instructions, refer to the Availability article.
A subcategory is a category assigned under a main/parent category. For example, a ‘Starters’ category can have ‘Appetizers’, ‘Salads’, and ‘Soups’ as subcategories.
- A main category can have multiple subcategories, but subcategories cannot have further subcategories assigned to them.
Step-by-step guide for Adding Subcategories:
- Create a Regular Category:
- First, create the subcategory as a regular category by selecting "Add Category", filling out the Add Category edit menu, and selecting "Save".
- Assign to a Main Category:
- Select the main category you want to assign the subcategory to.
- Toggle ON ‘Is Category Group’:
- In the main category edit menu, toggle ON "Is Category Group". An additional field titled ‘Categories’ will appear.
- Assign Subcategories:
- Type in and select the subcategories you want to assign to the main category in the Categories field.
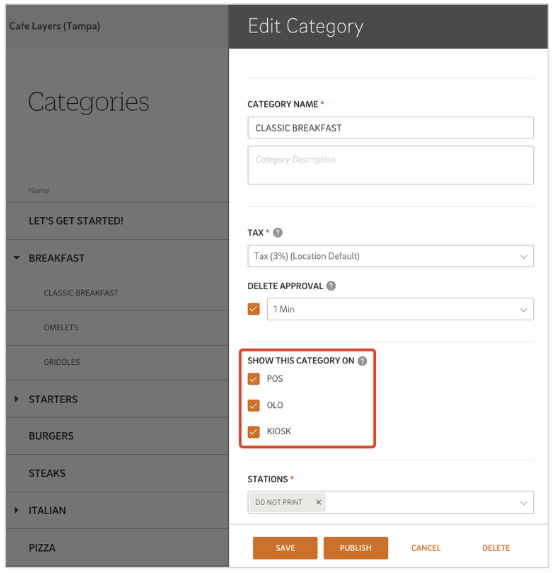
To manage subcategory visibility:
- Access the Subcategory Edit Menu:
- Select the subcategory under the Categories tab to bring up the ‘Edit Category’ menu.
- Set Visibility:
- Scroll down to the 'Show this category on' section and configure the visibility settings for the subcategory to show on POS, Online Ordering, and/or Kiosk.
Best Practice: To ensure consistency and streamline updates across all locations, it's crucial to make all menu edits at the Enterprise Level. Editing at the individual location level can cause disconnections between the enterprise and location menus, which can result in future updates not being reflected at the location level. Always edit from the Enterprise Level to maintain consistency and ensure all locations are up-to-date with the latest menu changes.
Features
For businesses with multiple locations, the Enterprise Menu offers additional features to enhance flexibility and control. Here’s a detailed look at these features:
At the top of the Category Edit menu, you'll find an availability field. This allows you to specify which locations should display a particular category, giving you the flexibility to tailor menus according to each location's needs.
FAQ
Q: How do I access the Enterprise Level?
A: To access the Enterprise Level, follow these steps:
- Log into CAKE Admin Portal: Log into CAKE Admin Portal and select the Menu Admin icon.
- Select the Enterprise Level: You will be prompted to select the location you would like to access. Choose the Enterprise level, identifiable by the arrow to the left of the enterprise name. Selecting the arrow will reveal the locations within the enterprise.
Q: What happens if I make an edit at the location level?
A: Editing at the location level can create inconsistencies between the location menu and the enterprise menu. Future updates made at the enterprise level will not affect fields that were edited at the location level. To maintain a seamless connection and ensure updates are reflected across all locations, always make edits at the enterprise level. If a disconnection occurs, contact support to re-establish the connection.
Q: What if I only need to update the menu for one of my locations?
A: For menu data specific to a single location, it's best to create it at the enterprise level. Use the availability field to designate which location can access it. This approach allows for easy expansion to other locations in the future by simply adjusting the availability settings.
^^Back to Top
Enterprise Menu Navigation Page