This guide outlines how to adjust the Sending Settings on your POS system to optimize order management and kitchen communication. Whether you prefer orders to be sent manually, automatically, or require specific behaviors for custom items and prep tickets, this article will help you configure the system according to your needs.
Table of Contents
Accessing Sending Settings
To access the Sending System Options, follow these simple steps on your POS system:
- Go to the Main Menu.
- Select Settings.
- Navigate to System Options.
- Click on the Sending tab.
Key Sending Settings
1. Sending
- Toggling On: Activates the Send button in the POS, allowing orders to be manually sent to the kitchen.
- Toggling Off: Requires guests to pay before orders are sent to the kitchen.
Note: If your workflow involves guests paying before receiving food, keep the Send button toggled off.

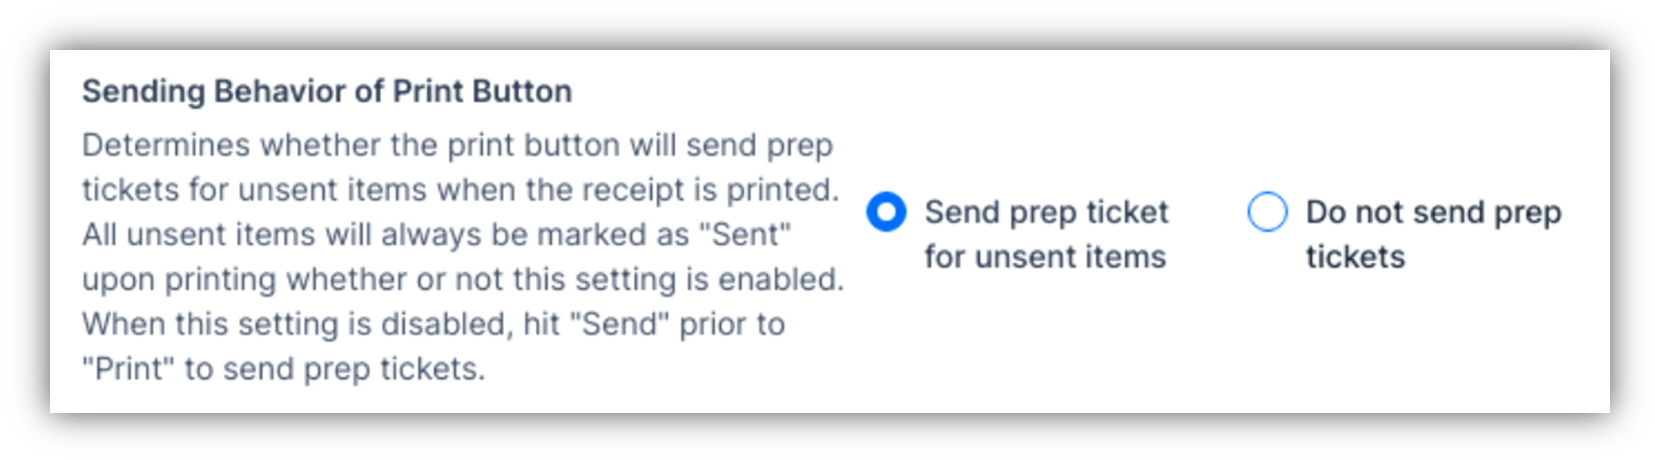
2. Sending Behavior of Print Button
This determines when a prep ticket is printed:
- Print Prep Tickets for Unsent Items: Prints a prep ticket when the Print button is pressed, even before the Send button is used.
- Do Not Print Prep Tickets: Prep tickets are only printed when the Send button is pressed.
Scenarios:
- Sending Disabled + Do Not Send Prep Tickets: Only a receipt will be printed.
- Sending Disabled + Send Prep Tickets Enabled: A prep ticket will be sent to the designated station (or KDS if used).
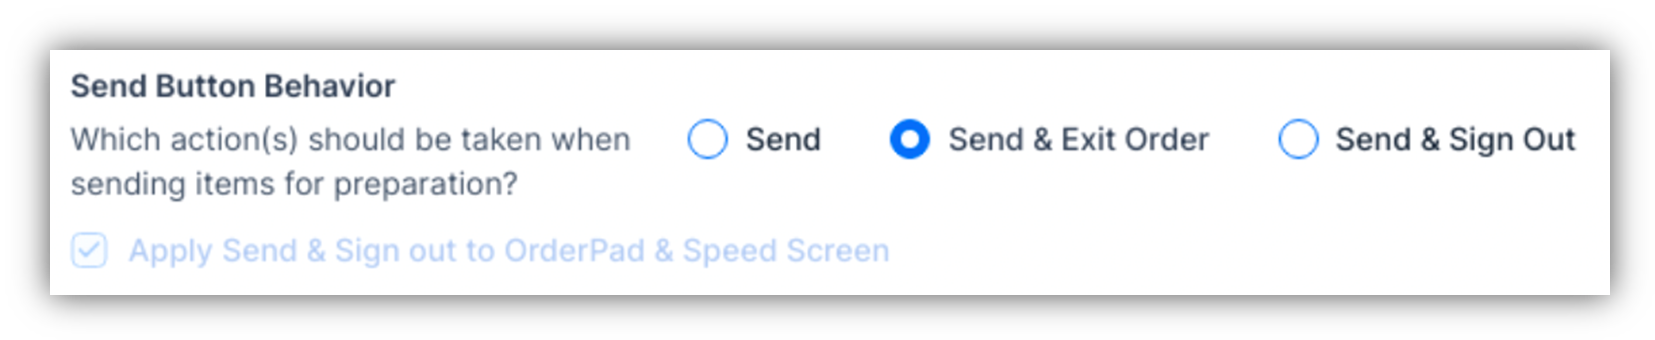
Defines what happens when the Send button is pressed:
- Send: Remains on the same order screen.
- Send and Exit Order: Sends the order and exits to the Order Queue or Tables Screen (depending on your restaurant's settings).
- Send and Sign Out: Sends the order and signs out the user. This can also be applied to CAKE OrderPad users.
- Toggled On: A dialog box appears with options for course breaks and holding items.
- Toggled Off: Access the overlay by holding down the Send button.

- When enabled, a reminder prompts servers or cashiers to send menu items before exiting the order screen.

- When enabled, creates a separate prep ticket for each menu item, enhancing order tracking.

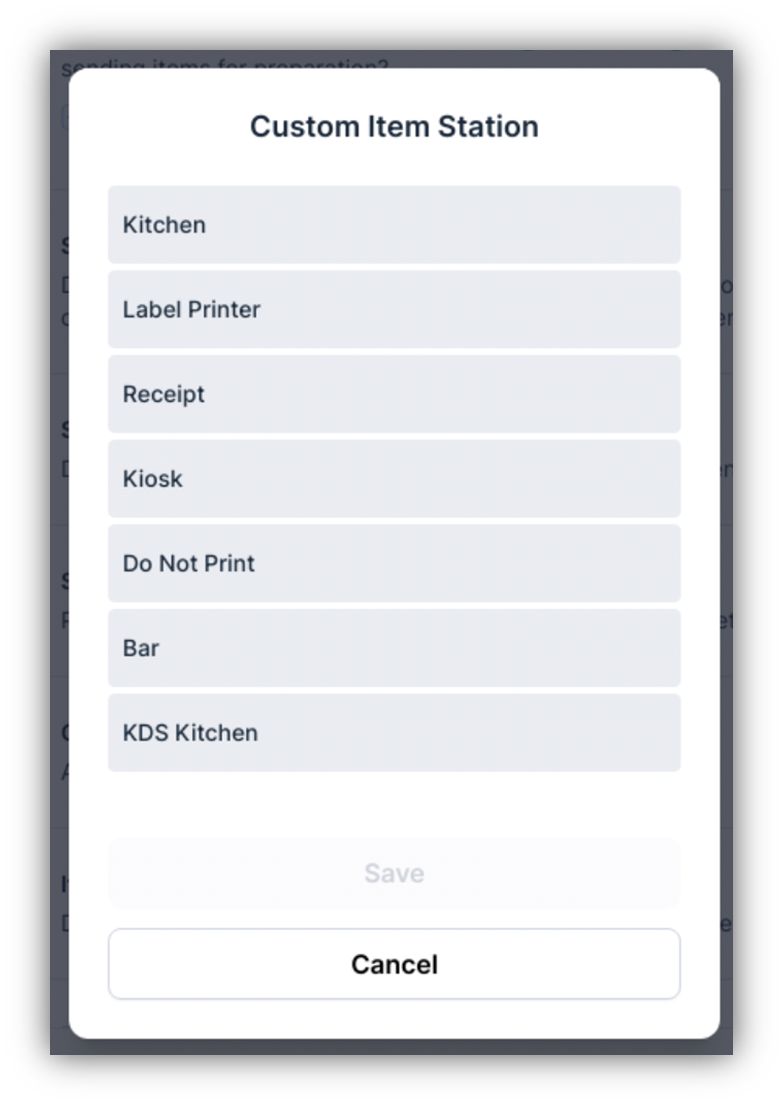
1. Custom Item Station
- Allows customization of where specific items (e.g., open or custom food items) are sent.
- Custom Item Printer: Toggles the ability to assign custom or open items to a specific printer. Full-service restaurants may want to assign this to the kitchen.

2. Items Sent to Other Printers
- When enabled, all items print on every prep ticket, regardless of their initially assigned printer, ensuring kitchen staff are fully informed.

- Prep Ticket Font Size: Default is small to conserve paper. Select large if larger text is required.

| Setting | Functionality | Best Practice/Recommendation |
|---|
| Send Button | Allows manual sending of orders to the kitchen. | Toggle off for pre-payment workflows. |
| Print Button Behavior | Controls when prep tickets are printed. | Enable Print Prep Tickets for Unsent Items for flexibility. |
| Send Button Behavior | Defines the screen displayed after pressing the Send button. | Use Send and Exit Order for faster server navigation. |
| Send Reminder | Prompts staff to send items before exiting the screen. | Enable to avoid missed orders. |
| Send Items Individually | Creates separate prep tickets for each item. | Enable for large or complex orders. |
| Custom Item Printer | Assigns custom items to a specific printer. | Set to kitchen for open food items in full-service setups. |
| Prep Ticket Font Size | Adjusts font size on prep tickets. | Use small font to conserve paper. |
Best Practices
- Enable Send Reminder to prevent missed orders.
- Use Send Items Individually for large parties or complex orders.
- Assign Custom Item Printer to the kitchen for open food items in full-service restaurants.
- Choose Print Prep Tickets for Unsent Items for orders needing confirmation before being sent to the kitchen.
By customizing your Sending Settings, you can streamline order management, improve kitchen communication, and ensure a smoother workflow in your establishment. Always Save Changes after configuring your settings to apply the updates effectively. For further help, contact CAKE support via phone at (352)722-2253.
Review Payment Settings Next
Return to System Options Overview